I found several recipes for the dough online. We used:
2 cups AP flour
1 cup salt
1 1/2 cups (give or take) cool water
extra flour - half a cup or so
I also added a bit of glitter and tiny glass beads for a snow-like effect. I couldn't really tell it was there in the cooked ornaments, so I either used too little or it just didn't work.
Anyways, put the ingredients in a big bowl and mix with hands. No pictures of this, but I divided the recipe equally and let each girl mix her own. If it was too sticky we added a little more flour.
Other tools/ingredients:
tips of skewers (for "carrot noses")....cut the end of a skewer off with wire cutters, then use a pencil sharpener to make another point, cut that, etc. You could use toothpicks, but they seemed too thin to me, but it would work in a pinch.
Orange paint (for "noses")
Black felt or fleece (for top hats)
black beads (for "coal eyes" and mouths)
fabric scraps for scarves
tacky glue
paper clips for hangers*
dry paintbrush to wipe off excess flour
After the dough was mixed, we pinched off golf-ball sized pieces and rolled them with our hands into spheres.
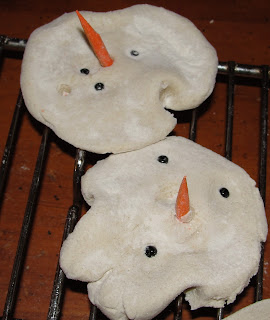
We dipped a cup in flour to prevent sticking and smashed the ball down into a round disc. Then, using the pincher grip of thumb and forefinger (little fingers are especially good at this), we pinched a "neck" about 3/4 of the way down the disc, like this:
After making the neck, we poked in bead-y eyes, skewer-carrot noses and popped the snowman heads into the oven to dry.
This is what took so long. We dried the heads at 200 degrees for about 2 hours, then left the oven closed for a day and a half. Truth was, yesterday was just too busy to get back to the project, and the extra day allowed them to dry completely.
While you're waiting, cut out hats and scarves. The scarves should be about 4" long and pretty thin. If you use fleece, cut it on the stretchy grain, give it a good tug so it will curl.
Take 'em out of the oven, tie scarves around their squatty necks and glue on hats cut from felt.
I didn't even know that Hannah knew how to tie...but she did a half hitch and I showed her how to double it to make it stay in place. You can see that snowman had an extra eyeball growing out of the center of his forehead which I picked out with my fingernail.
....if any "necessary" eyeballs fall out after they've been baked, a dab of tacky glue will do the trick. Just brush out any excess flour first - in this case, I had two overzealous flour stampers dipping their cups in flour to smash the "snowballs."
Have the girls pose with their favorites....
Here's the group....
Here's some closeups.....
Honestly, I wonder if my girls have even SEEN snowmen!!
* I completely forgot to do this, but this is how you SHOULD make hangers for your snowmen. Take a metal paperclip and pull the inner loop out from the outer loop so it makes a giant "S". It should break but if not, wiggle it back and forth until you have two 3/4 oval shapes. Press the ends of the clip into the back of the snowman heads BEFORE YOU BAKE THEM somewhere near the top center of the back of his head. Put it in there deep so you only have about 1/4" of the loop sticking out. Picture an upside-down "U" shape. Bake that in the head and then string some ribbon, yarn, string, etc. to hang it on your tree.
I'm pretty sure any family members who read this will be seeing these snowmen again...


Such cute little snowmen!! Thanks for posting this on your blog with all the steps! I can't wait to show it to my kids!!
ReplyDelete