Showing posts with label tutorial. Show all posts

Friday, September 3, 2010

A Recipe For the Birds

Someone asked me the other day to share my recipe for suet cakes, and was only too glad to oblige! 

Now, technically, suet cakes are made from rendered beef fat that theoretically can be purchased at a butcher or sometimes found in the meat department of the grocery store.  But in Real Life I've found that when I am able to find suet, the birds don't care for it as much as what I make myself.  Pre-made, pre-packaged suet cakes  can be purchased at the dollar store for - guess what - a dollar each, or you can make them very frugally at home with leftovers. 

For us, making our own suet cakes involves my best parenting skills, some homeschooling lessons and satisfies a portion of our entertainment budget - birdwatching.

For starters, begin to collect the following:
  • "edges" off of PB&Js (<---parenting skills!)
  • freebie bran cereal that gives everyone tummy aches if they eat it (coupons!)
  • stale cheerios (coupons again!)
  • forgotten fruit including skins and cores
  • lumpy grits
  • spilled oatmeal
  • stale bread
  • heels of bread - but only after you've made enough bread crumbs
  • raisins that get spilled in the pantry and are too dirty to eat
  • stale cookies
  • peanuts that the 3 year old sucked the salt off of and tried to put back in the jar (!)
  • mushy blueberries that no one will eat
  • etc., etc.

Store these items in the freezer.  I use a bread bag and just dump the stuff in as it collects, tie it off loosely and replace it in the same spot every time so I know what it is. 

See?  Bird stuff on the right, hot dog buns on the left.
Next, getcha some shortening.  Not the all vegetable kind, either.  You're going for the artery busting stuff - Manteca - the animal byproduct, gross-out staple of the Southern Pantry. 
Mmmm, mmmm! 
Seriously, though, the birds need fat to convert to energy so they can fly.  Have YOU ever tried to fly?  Its tiring stuff.  You need manteca.  Well, THEY need it.  YOU need Omega-3s, but that's another topic.

Melt that stuff down.  Scoop out a couple cups of it and put it on the stove top, stirring, watching carefully, because it will burn.  And start a BIG hot fire.  I know these things.


Then, get out one of your jars of $1 or less peanut butter - from a good Kroger sale where you stocked up on 22 jars of it or from where you found it at the Dollar Tree.  Scoop out a cup or so of that, too and put it in the pot to melt along with the shortening.  Yummo!


Now, why I don't have a picture of this next step is beyond me.  But I think you can figure it out without the visuals.
  • Dump the aforesaid bread-bag-full-of-scraps into a giant metal or glass bowl.  If you want to keep the squirrels and chipmunks away, add a generous few dashes of cayenne pepper.  No harm to the birds, but mammals don't like it.
  • Pour the peanut butter/shortening mix over top of the scraps.
  • Mix with a spatula very well so that all of the scraps are covered.  Beware: its hot.  If you're using this as a homeschooling lesson, let the kids know to stir carefully so they don't burn themselves. 
  • If you need more shortening and peanut butter, go for it.  I use a ratio of about 3:1 with shortening and PB.  You just want the PB there for the taste mostly.
  • Pat it all out nicely into a cake pan:
Mouthwatering!

Slice and serve!

Store the unused portion in the freezer.  Again, it would be a good idea to label the container.  You don't want Daddy-o getting his hopes up for a freezer pie and then having them horribly dashed when he takes a bite of that gross stuff.

Oh, and if you look really carefully in the picture above you'll see a blue snowflake-looking sequin where the cake slice was removed.  That's from where I swept up something - probably cheerios - off the floor and just dumped it in....!

Now, go take that chunk-o-suet-cake and put it in your suet feeder that is hung alongside your other bird feeders and watch the show.  You'll enjoy woodpeckers, various sparrows, tufted titmice, nuthatches, and even cardinals.

Here's a little downy woodpecker....
...all of 5 minutes after I put the suet into the feeder!
Homeschooling lessons:  Identify birds using a field guide or the Internet and talk about the varieties of birds and animals that God created for our enjoyment.  Discuss which birds prefer seeds, which prefer suet, which are foragers on the ground under the feeders.  Of course, in making the suet cakes there are dozens of lessons on food, measuring, heat, solids vs. liquids, etc.

Enjoy the birds!

Wednesday, July 28, 2010

Save Money on Grocery Shopping, Part 5b of 5

FL was a success!  I spent more than I planned, but they had cat litter on sale - unadvertised - but since the Arm & Hammer Laundry Detergent was on sale, I figured they might have the litter on sale too, so I brought my coupons along, just in case.  Saved $1.50/each off of 2 from the WM price.  Score! 


OK, Now I'm going to take you along while I plan my Kroger trip.  This is going to be fun, I promise...AND, it will be the last post in this series.  Whew!

First thing I do is gather my grocery list.  Mmmmm, not much this week - tuna, powdered milk, yogurt, milk, Popsicles.

Second, log in to coupon mom . com and select "Grocery Deals by State," from the scroll down list I select "VA-Kroger-Central"
Here is the screen that results from that selection:

(You can see that my BSecure Internet Filter is filtering out unwanted ads :)

Look down at the bottom right hand corner - I know, its tiny, but you'll see "% Saved" and two arrows.  Click on the arrow pointing "down".  What this does is give you the items that are on sale with the highest % off first, like so:


(I do it this way because I'm probably not interested in the items toward the bottom of the list that are listed as being on sale but are really only 0%-25% off)

See those words in red?  Those are FREE items!  Woo-hooo!!  See why I love this stuff?


OK, here's what you do next.  On the far left hand side of the screen there is a tiny box.  Scroll through the Kroger sale list and check off the items you want to add to your grocery list.  If you're looking for a specific item, like TUNA, you can put it in the box on the upper left hand corner (above) to pull up that deal.

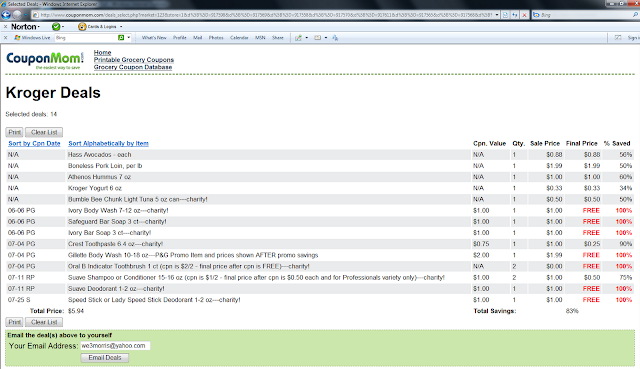
After you've made your selections, hit, "Display Selected Deals" at the bottom of the screen and you'll get a list like this:


Now, you can either email this list to yourself to print later, or print it directly.

The next step is to gather your coupons. 


OK, on the left are some codes:  N/A (no coupon available); PG = Proctor & Gamble, RP = Red Plum, S=SmartSource.  These are all names of the coupon inserts in which you will find your coupons.  So....go to your coupon organizer, look at the dates on your hanging files and pull the coupon inserts out of them, where you've been saving them for at least two weeks!  Look in those magic flyers and find the aforementioned coupons. 

Clip those coupons to the list that you printed out and shop away! 

As you can see from my list above, if I had all those coupons (I don't*) I would be able to purchase 14 items for a total price of $5.94 (not really**)!!

*I know I've already used a couple of those coupons, and I know that I don't have the 6/6 coupon files because I threw them away by mistake (horrors!).

**See how after some of the items it says, "promo item"?  That means, in this case, you have to buy a certain number of an item to get the discount.  With Kroger, its usually mix-and-match, and there are a dozen or more items that count toward the number you have to purchase.  Usually its something like by 10, get 30% off each item.  And usually, you'll have a few coupons for those items in your coupon box.  But, if you don't, and you still want the deal, just purchase the lowest cost item in the promotion to fill in the gap.

Now what?

Go shopping!  Stick to the list, don't be afraid to miss a sale (stay in your budget), have fun!

Oh, and about those items in RED....we just won't use some of them, but I'll probably pick them up anyways.  Donate them!  Your church undoubtedly has a food pantry, or else you can collect a bunch of stuff and surprise a college kid with 'em.  You can also stockpile them so that when you run out of shampoo or whatever you're not making a "quick trip" to the store which we all know will only result in buying extra stuff you don't really need.

One more thing:  You'll notice that my personal "needs" grocery list and the Kroger list don't really match up, except for that tuna and yogurt.  Does this justify my driving 20+ miles one way?  Notsomuch.  But, I'll be close to the Clifton Forge Kroger anyways and I need powdered milk, and their price is better than anywhere else for it.  So, unless I had to be over there anyways, this wouldn't be a good stockup week for me.  I have plenty of soap and toothpaste, deodorant and shampoo in my stockpile.  But since I'll be there anyways and some of the stuff is free....well, you get the idea.

Well, that about wraps it up.  Any questions?  Comments?  Does this work for you?  Lemme know and keep saving your coupon inserts - they'll save you $$!!

Friday, July 9, 2010

Save Money on Grocery Shopping ! Part 1 of 5


This is the first in a several part series of how you are going to start saving noticeably on your grocery bill. I'm not an expert or a Coupon Queen, but I have learned a lot about saving money at the grocery store, and I learn more all the time. I just want to share some of that knowledge with you so that you can put a dent into your own food bill.

(The bad kitty could care less about all this....he only wants to camoflage with the bedspread....)

There are a few things to keep in mind - rules, if you will - that will make this whole process work. Now, I live in a rural area, so my rules will be slightly different than yours, but once I share them with you, you can apply them to your own situation.


You know I like to write/talk, so this will be quite lengthy, but my hope is that I am being thorough so it can work for you. We are the stewards of our grocery budgets (Uh, yeh. I'm not good at this part, and I fail, fail, fail, but it is an ideal toward which I strive.), and this is an area in which we should be able to carve out an extra $20/$30 or more a week to spend in other ways - your choice what those other ways are, but at least you'll have that choice.

Another disclaimer. I get tired of the preparation of shopping, tired of using coupons, tired of looking for sales and tired of limiting my trips to the store. So I go way over my budget and spend way too much and blow our budget to where Andy gets very red in the face at me. Writing all this out is my way of bringing myself back on track, so it’s a means of accountability for me for now.  "Do as I say, not as I do..."


That said, let's begin:


1. Subscribe to the largest Sunday paper in your area. The one with the sale ads. You will make your money back on this investment after just one grocery run using the coupons and/or sale ads therein. Now, you could skip this step and plan to purchase the paper faithfully, week after week, but there are a few problems with this approach:

a. You won't go out every Sunday due to snow/sickness/laziness, etc.

b. Newsstand papers cost more than delivered papers - $1.50 a pop vs. $.50-.75 delivered.

c. When you go to buy a paper, you will buy coffee/candy/chips/something you don't need, and thus you will defeat the purpose of getting the sale ads!

d. If you find a great batch of ads in there you can always go buy another paper at the newsstand.

While you're waiting for your first paper to arrive, continue your preparation:

2. Buy or repurpose a hanging file folder holder. This can be a milk crate-style, a sturdy cardboard box, or, as I have, a plastic box specifically designed for the purpose. WalMart has these for around $9. You will also need some hanging files to go in it.


 3. Label the hanging file folders with the dates of the next 3 months of Sundays. Label four additional file folders as: coupon books, receipts, rebates, loose coupons*. I use a label maker that I got for an outrageously cheap price, but you can use masking tape for the labels. This is much easier than filling out those little inserts and trying to slide them in their sleeves. You'll never do it, you'll get discouraged and quit. I know. Write the date on the label in marker and as you rotate your dates you can just put another piece of tape over the old one or peel it off.


You can see here how the older file dates are waiting to be recycled and moved to the back to hold newer coupon flyers....and lurking in the back is an old coupon binder (shudder).  We won't be clipping coupons and tediously filing them under categories....yay!!!


4. Gather your supplies to keep in the file box: Scissors, blank envelopes (repurpose bill envelopes; you only need one "clean" side for writing your list), a pen and paper clips.

5. Put a blank pad of paper (or envelope or whatever) and a writing implement near the refrigerator or pantry, and keep an ongoing grocery list. There are two things you'll need to be keeping track of:

a. Things of which you have run out;

b. Things which are running low in your inventory (more later on that) should you find them on sale. For me, I write "SU" (stock up) or "IOS" (if on sale) on my list.

Got all that? Good. Now you're ready to get ready to shop. It's not as complicated as it sounds. Once you have all of the above in place, things will run rather smoothly.

We'll come back to the coupon box in part 4 of the series. This is the easy part. Besides, there are a few things you need to attend to that will get you saving money right away.

*or, for your "loose coupons" file, you can have it stacked in an easy access place like on your desk along with your other miscellaneous folders for which you can't seem to find a place....


The dreaded coupon binder....lovely to look at, cumbersome and nigh unto impossible for me to use!!

Questions?
Comments? 
You know where to click below!

PS:  As I reviewed this article, I noticed the verse of the day:
Whoever loves money never has money enough; whoever loves wealth is never satisfied with his income. This too is meaningless.  Ecclesiastes 5:10 (NIV)
None of this comes before Christ.  Don't let it become an idol.  If its too much trouble, chuck it.  But I think that this is a way that we can honor God with our finances. :)

Wednesday, June 16, 2010

Password Protection and a FREE GIFT!

I'm taking a minute out of my busy, busy week to jump on and let you know about something that happened to a good friend of mine: Her PayPal account was HACKED! And since her bank account is linked to her PayPal account, thieves also gained access (temporarily, at least) to her bank account! Yikes! And although she had it quickly straightened out and didn't lose any money out of pocket, it was still unsettling, time-consuming, disruptive, disturbing - and (insert synonym here)!

You're thinking, as was I, that PayPal is CERTAINLY safe....and it IS! In fact, I have a PayPal account, also connected to my bank account, and I intend to keep them BOTH. You should too. BUT what you SHOULD do, is QUIT USING THE SAME PASSWORD ON ALL OF YOUR ACCOUNTS! INCLUDING E-MAIL! Wait....ESPECIALLY E-MAIL!

I'm sorry to have to shout like that, because, as you know, I try to keep this blog friendly and upbeat - garden, butterflies, kids - but I have a feeling that - -

CHANGE YOUR PASSWORDS TODAY!!

- - - whoops - - - there's that yelling thing again - - -

I have a feeling that, if you're like me, you get complacent and might gloss over things, so yelling will get your attention. (Unless, of course, you're in the under-6 set and your last name is Morris and you don't listen to anything I say, much less yelling, then this is not for you.)

So, back to my pal's - that is, my Friend's - story: After she noticed that her bank account was missing over $300, she found that there had been two PayPal draws on the account - neither of which was made by her or her husband. So she called PayPal (no doubt in a panic) and was told that while PayPal is nigh unto impossible to hack, E-MAIL is extremely easy. (If you're a hacker, that is....).

As an aside - she also said that the PayPal rep she spoke with was very soothing and professional and provided every assurance that PayPal is indeed secure, AND that when she hung up the phone, she was no longer in panic mode but had a clear set of steps to follow thanks to PayPal. )(Kudos to PP.....)

Now, back to our story: Most of us have web-based e-mail, right? Like yahoo.com or gmail.com or (fill in web-based email here). Well, it seems that those accounts are easy to hack. And shoot, blogger dot com is probably easy to hack, too, so beware of any posts that don't seem to be from me after this - who knows who I might anger? These types of websites do not have the layers of protection as does, say, a financial institution or PayPal.

Back to our story:
The Bad Guy(s) hacked her email account password and muttered (because bad guys mutter, you know?):
"I bet this chick uses the same password for all her accounts.....and.....(tap, tap, tap)....hah!...there it is......good.....now for her PayPal......this is too easy.....let's go shopping for electronics......(whistle)......bonus, it's attached to her bank account, so....(tap, tap, tap).......cool........and now to shop for a new cell phone....."
and so on and so forth.

Now, what are you going to do after reading this post? Shake your head sagely and say, "she's lyin' again...."? Fix a bread-and-butter-sandwich? Pickle those watermelon rinds you've been saving? Send me a FrontierVille gift?

NO! YOU ARE GOING TO CHANGE YOUR PASSWORDS!

And here is what you are going to remember as you change them:
1. They should all be different. Yes, this is a pain, but you must do this.
2. They should be unique. This means NO birthdays, no last 4 digits of anything, no street addresses, nothing. Make it up. C'mon, you can do it.
3. It should contain letters and numbers and characters - at least a combination of the two. We're going for protection, here, you know.
4. Write them down.* Do it!

(*Do you want me to make a password notebook for you as an incentive to change them? Seriously. Because I want to Do My Part to keep the web safe and fun. For the first ten folks who comment below, I will make you a sweet little password notebook and get it to you by first class mail or otherwise as a special free gift for reading this blog. No, I don't have a picture of what it looks like, so it will be a surprise. To both of us.)

Don't put it off!

GO DO IT NOW!

Wednesday, January 13, 2010

Homemade Laundry Soap, Part 2

Well, as for cleaning, it seems to clean as well as any other. The true test is whether it bothers our skin at all - Andy said if he starts itching to death or anything he's dumping the whole batch in the creek. If you live downstream and notice that your crayfish are especially shiny, then you'll know what happened.

But so far, there have been no complaints.

I also made another batch of detergent, using the same ingredients, but this time I chose to make a powder recipe. I used the same boxes of opened Borax and Super Washing Soda, and the baking soda cost me, oh, what - $.39/box at WalMart? Again, the bar of soap was $.79 (not on sale). So, using the products I had on hand, it was less than $1.50 for many loads. I don't have an exact number of loads, but I'll count.

Here goes:

1 scant bar of Octagon Soap (smuggled in this time, so Andy doesn't have a flashback) (use 2 cups, not packed down, but bang the measuring cup on the table to make sure its close to 2 cups. I had about 1/2 cup left over)
2 cups Baking Soda
2 cups Super Washing Soda
3 cups Borax

Grate soap finely* (now, the recipe calls for "bar soap." However, Octagon and Fels-Naphtha are soaps specifically marketed as stain removers or laundry soaps, so I chose that one. You can also use Ivory, and feasibly any other soap your family enjoys. This would also be one way to avoid the itching issue as indicated earlier.)
Add remainder of ingredients and mix well.
Mix very well.
Pour into a clean, dry apple juice bottle you've been saving for something like this.

Use about 1/4 cup for each load.
Yield: Approximately 2 quarts dry "powder"


*I used a cheese grater with a fine grate. I wish I had a box grater because this was the Pampered Chef roll-type grater I found at a thrift store years ago and it is nigh unto impossible to clean. So if you've over for supper soon and I ask if you want fresh grated Parmesan cheese on your pasta, I'd suggest you politely decline. Unless you like burping soap bubbles.

Stay tuned for updates as to the status of this experiment!

Friday, October 23, 2009

paper mache...papyay mahshay squash

Now, I'm no Martha or Amy Kachinsky (hi! Amy! you still read this?!), but I enjoy making things that look like things and I'm not so bummed out if they don't look JUST like things. But if you want to know how to make something that looks like a pumpkin, here's how:


1. Make paper mache goop. In this recipe, I used 5 parts water to 1 part AP flour. Bring 4 parts (in this case, 2/3 cupfuls because that's the measuring cup I grabbed first) water to a boil. In a cup, mix remaining 1 part water with the AP flour and whisk with a fork.


2. When water is at a full rolling boil, add the mixture and whisk well. Bring back to a boil and boil hard for one minute. Remove from heat. Add a generous dose of cloves, vanilla, cinnamon or some other scent if the smell of the paper mache goo is too much for you. My 5 y.o. wouldn't touch the project until I did it, but I had some old ground cloves on the shelf that got put to good use.


3. While the goo is cooling, wad up some newspapers in the general form of what you want to make. Here, its going to be a pumpkin. Really and truly.


4. Pumpkins aren't exactly round, so to approximate their shape, kind of gather up the 4 corners of the paper and roll them on toward the center. Then take a wide strip of paper, roll it up for the stem. Tape it loosely so it will stick while you do the next step.....


whoops....this is going to be a Hubbard squash....


5. Once the goo has cooled to the touch (about 1/2 an hour), dip strips of newspaper in to cover thoroughly. Scrape off the excess by drawing it over the edge of the pot as you pull it out. In this photo you can see that it is still boiling - but don't do what I do...do what I say (famous parenting words). You can also ignore the lumps in the goo....its paper mache, not gravy, and your MIL is not coming to suppah. So ignore.

Helpful hint: Tear up a generous amount of newspaper strips BEFORE you start loading them on your form. They should be about 1-2" wide, with some narrower, and about 4-12" long, again, depending on the size of your project. For the pinata or a form with a broader shape, wider helps the coverage to go faster. For smaller projects like gourds or fruit, smaller, narrower strips will lay better and look better in the end.


6. Then just kind of drape your newspaper strips over the form. Your goo will be thicker than mine in this photo because I didn't get the ratio right for the tutorial and I ended up throwing it out at the end. But if you follow 5:1, it will turn out prefect.


7. Keep on keepin' on layering until you have the shape you want. Its a messy job, to be sure, but when was the last time you did something like this?? And Fall holidays are only the beginning! Check back for our Easter Egg tutorial in the Spring!
Dip newspaper strip, wipe, layer, smooth, dip, wipe, layer, smooth, dip, wipe, layer, smooth....

8. When you're satisfied with the shape, set the gourds aside to dry - at least 24 hours in a dry house. I put mine by the woodstove to dry overnight, and others I put in the oven at 200 degrees to dry for a few hours, turned off the oven, turned it back on, off, on, off....for 2 days and they dried out fine.


9. When dry, paint as desired....

10. Spray with Acrylic Sealer (I used gloss) to give them a shine....


Isn't that shiny?

And use them as a delightful addition to your Fall sofa table display. Really. Your MIL will be impressed.

letter practice/sensory practice bags


This was definitely not my idea - I saw it on another blog. But I thought it was so cool - and it is! - that I decided to do a tutorial so you could make your own.

I don't know what you'd call them, except sensory bags - but they're not really, except that they ARE squishy. Kids can practice 'drawing' shapes or writing letters with a light touch (preschoolers) or with a Q-Tip (kindergarten +). I wouldn't recommend these for older kids - especially pre-teen boys...sorry SM!....because they may be too tempted to pound on 'em good and then, SPLAT! with disastrous results. But you can always live on the edge, you know...both my girls love these.


1. Gather up your supplies. You always do that first, right? You'll need quart-size freezer bags, some paint - all I had was acrylic, but you could use tempera, too. Also needed is some good, wide, sturdy tape like masking tape or packing tape (not shown). I guess you could use gallon-size bags, but when I tried it myself, it seemed like an unwieldy size. So, just use what you have on hand. I had the giant bottle of paint because of my pumpkin painting project, but the smaller bottles are only about 50 cents at th'WM.
You'll want to go with a lighter paint. I like the look of the pink better than the red, and the orange better than the red, too. But just try it out. If your background (desk/kitchen table) is really light, then maybe a darker paint would work.


2. Open a Ziploc bag and squish some paint in. Now, I tried to eyeball it, and it looked to be about 3-4 tablespoons. I think that less is more, because I ended up having to squish some back out of the orange bag...not pretty. Of course, if you're using a larger bag, more paint goes in.


3. Mash the paint around a bit to see if it looks like it will cover the inside of the bag. You don't want it so deep that gentle pressure won't leave an impression, but also not so sparse that you can't tell what the impression is. This is the step where you get the amount right, because in the next step you will be....
4. Putting the tape on. I probably should have used masking tape for the tutorial, but I couldn't find it. The goal is to completely seal the top of the bag. I laid the bag on its side, put the tape just below the 'zip' and then turned the bag over, sealing the top down to the other 'zip.' There was overlap, and I cut off all but about 1/4 inch. Just for insurance.


5. OK, now you're done! Use a Q-Tip (ahem, a cotton swab) to make designs or practice letters. The bags withstood 3 days of homeschool use with my 5 y.o., who is by no means gentle. She practiced writing M, S, L and who-knows-what and she seemed to like them.

I even practiced my initials some.

Thinking about how this could be improved, I wonder if some other medium could be used like a thinned out version of the paper mache goop with food coloring, dish soap with food coloring or even old beef gravy or yogurt that you are so sick of eating but you can't bear to throw away....