Showing posts with label crafts. Show all posts

Tuesday, October 11, 2011

A Week of Creativity

Inspired by a pin I saw on Pinterest (you HAVE lingered there, right?!), I made this wall hanging as a gift for a friend who is having her first baby:


The fabric and ribbon are new, but most of the buttons are "vintage."


....and I made a card to go with it:

Friday, December 3, 2010

Advent Calendar #1 (?)

My pal Emily called the other night and asked if I'd whip up an Advent calendar for her....WHAT?  My first thought was, "Gosh, now I have to really mo-ti-vate and psych myself up to do something that I've been putting off for two years!"

Well, actually, I did it, and it wasn't so bad!  Now I can't wait to make one for us.  I'm hoping to work on it tonight and tomorrow so check back later to see how I did.

Anyways, just a picture for this one: 


Its complete except for the dowel that goes through the top and a gold cord to tie to the ends for hanging.  You can't see here but each Christmas tree has a slit in it midway in which to insert lollipops (as shown) or mini candy canes.  And the felt background is red, not fuchsia....

Thank you, Emily for motivation to finally make an Advent Calendar!  I love it!

Wednesday, December 1, 2010

Salt Dough Ornament Craft

This "easy" craft has taken us three days to complete - but the chunks of time were perfect for the attention span of the Littles.  Its got all kinds of good stuff rolled into one activity: manual dexterity, fine motor skills, measuring, texture, counting....

I found several recipes for the dough online.  We used:
2 cups AP flour
1 cup salt
1 1/2 cups (give or take) cool water
extra flour - half a cup or so

I also added a bit of glitter and tiny glass beads for a snow-like effect.  I couldn't really tell it was there in the cooked ornaments, so I either used too little or it just didn't work.


Anyways, put the ingredients in a big bowl and mix with hands. No pictures of this, but I divided the recipe equally and let each girl mix her own. If it was too sticky we added a little more flour.


Other tools/ingredients:
tips of skewers (for "carrot noses")....cut the end of a skewer off with wire cutters, then use a pencil sharpener to make another point, cut that, etc.  You could use toothpicks, but they seemed too thin to me, but it would work in a pinch.
Orange paint (for "noses")
Black felt or fleece (for top hats)
black beads (for "coal eyes" and mouths)
fabric scraps for scarves
tacky glue
paper clips for hangers*
dry paintbrush to wipe off excess flour


After the dough was mixed, we pinched off golf-ball sized pieces and rolled them with our hands into spheres. 

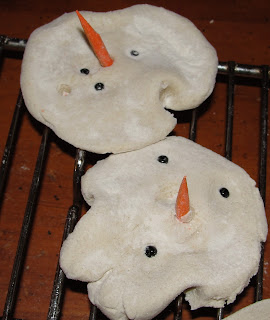
We dipped a cup in flour to prevent sticking and smashed the ball down into a round disc.  Then, using the pincher grip of thumb and forefinger (little fingers are especially good at this), we pinched a "neck" about 3/4 of the way down the disc, like this:

After making the neck, we poked in bead-y eyes, skewer-carrot noses and popped the snowman heads into the oven to dry.

This is what took so long.  We dried the heads at 200 degrees for about 2 hours, then left the oven closed for a day and a half.  Truth was, yesterday was just too busy to get back to the project, and the extra day allowed them to dry completely. 
While you're waiting, cut out hats and scarves.  The scarves should be about 4" long and pretty thin.  If you use fleece, cut it on the stretchy grain, give it a good tug so it will curl.

Take 'em out of the oven, tie scarves around their squatty necks and glue on hats cut from felt. 

I didn't even know that Hannah knew how to tie...but she did a half hitch and I showed her how to double it to make it stay in place.  You can see that snowman had an extra eyeball growing out of the center of his forehead which I picked out with my fingernail.


....if any "necessary" eyeballs fall out after they've been baked, a dab of tacky glue will do the trick.  Just brush out any excess flour first - in this case, I had two overzealous flour stampers dipping their cups in flour to smash the "snowballs."


Have the girls pose with their favorites....

Here's the group....


Here's some closeups.....

Honestly, I wonder if my girls have even SEEN snowmen!!

* I completely forgot to do this, but this is how you SHOULD make hangers for your snowmen.  Take a metal paperclip and pull the inner loop out from the outer loop so it makes a giant "S".  It should break but if not, wiggle it back and forth until you have two 3/4 oval shapes.  Press the ends of the clip into the back of the snowman heads BEFORE YOU BAKE THEM somewhere near the top center of the back of his head.  Put it in there deep so you only have about 1/4" of the loop sticking out.  Picture an upside-down "U" shape.  Bake that in the head and then string some ribbon, yarn, string, etc. to hang it on your tree. 

I'm pretty sure any family members who read this will be seeing these snowmen again...

Tuesday, March 30, 2010

(Frugal) Dyed Eggs

At least 5 years ago, I bought an 8-pack of Wilton paste food coloring at Michael's Craft Store with a 40% off coupon. It couldn't have cost more than a few dollars, and has turned out to be one of my best investments - we use them for homemade play dough, homemade birthday cakes and, of course, dyeing Easter eggs. Pink is the only color that is getting low in the pot, and I think that in another year or so I'll have to buy a solo container of that one. The others are still going strong!

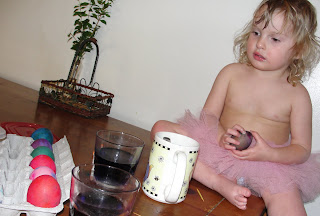
We did this after supper, and after bathtime......

Abigail chose to dress for the occasion, while.....

Hannah took a more casual approach to her attire.

We had an abundance of brown eggs this year; our neighbor boy up the hill stopped by two weeks in a row. I didn't remember from last year whether brown eggs took the dye very well -

but here, Hannah shows that for the stronger colors, at least, they worked just fine! I used the lightest eggs of the two dozen we had on hand, just in case.

Homemade Easter Egg Dye

1 tbs white vinegar per dye color desired
1 cup (approx; just eyeball it) boiling water
paste food coloring- as much as will fit on a toothpick when you scrape it in the pot

Mix vinegar, water and dyes (separately per color) in glass containers (plastic will stain) and stir well. Soak hard boiled eggs in dye bath for a few minutes, and:
WAH-LAH!
You just saved a few dollars on packaged dye! Plus, you can dye eggs any time of year with what you have on hand (red, white & blue? green for St. Pats?). Use the egg carton the eggs came in to hold your finished creations.

Friday, October 23, 2009

paper mache...papyay mahshay squash

Now, I'm no Martha or Amy Kachinsky (hi! Amy! you still read this?!), but I enjoy making things that look like things and I'm not so bummed out if they don't look JUST like things. But if you want to know how to make something that looks like a pumpkin, here's how:


1. Make paper mache goop. In this recipe, I used 5 parts water to 1 part AP flour. Bring 4 parts (in this case, 2/3 cupfuls because that's the measuring cup I grabbed first) water to a boil. In a cup, mix remaining 1 part water with the AP flour and whisk with a fork.


2. When water is at a full rolling boil, add the mixture and whisk well. Bring back to a boil and boil hard for one minute. Remove from heat. Add a generous dose of cloves, vanilla, cinnamon or some other scent if the smell of the paper mache goo is too much for you. My 5 y.o. wouldn't touch the project until I did it, but I had some old ground cloves on the shelf that got put to good use.


3. While the goo is cooling, wad up some newspapers in the general form of what you want to make. Here, its going to be a pumpkin. Really and truly.


4. Pumpkins aren't exactly round, so to approximate their shape, kind of gather up the 4 corners of the paper and roll them on toward the center. Then take a wide strip of paper, roll it up for the stem. Tape it loosely so it will stick while you do the next step.....


whoops....this is going to be a Hubbard squash....


5. Once the goo has cooled to the touch (about 1/2 an hour), dip strips of newspaper in to cover thoroughly. Scrape off the excess by drawing it over the edge of the pot as you pull it out. In this photo you can see that it is still boiling - but don't do what I do...do what I say (famous parenting words). You can also ignore the lumps in the goo....its paper mache, not gravy, and your MIL is not coming to suppah. So ignore.

Helpful hint: Tear up a generous amount of newspaper strips BEFORE you start loading them on your form. They should be about 1-2" wide, with some narrower, and about 4-12" long, again, depending on the size of your project. For the pinata or a form with a broader shape, wider helps the coverage to go faster. For smaller projects like gourds or fruit, smaller, narrower strips will lay better and look better in the end.


6. Then just kind of drape your newspaper strips over the form. Your goo will be thicker than mine in this photo because I didn't get the ratio right for the tutorial and I ended up throwing it out at the end. But if you follow 5:1, it will turn out prefect.


7. Keep on keepin' on layering until you have the shape you want. Its a messy job, to be sure, but when was the last time you did something like this?? And Fall holidays are only the beginning! Check back for our Easter Egg tutorial in the Spring!
Dip newspaper strip, wipe, layer, smooth, dip, wipe, layer, smooth, dip, wipe, layer, smooth....

8. When you're satisfied with the shape, set the gourds aside to dry - at least 24 hours in a dry house. I put mine by the woodstove to dry overnight, and others I put in the oven at 200 degrees to dry for a few hours, turned off the oven, turned it back on, off, on, off....for 2 days and they dried out fine.


9. When dry, paint as desired....

10. Spray with Acrylic Sealer (I used gloss) to give them a shine....


Isn't that shiny?

And use them as a delightful addition to your Fall sofa table display. Really. Your MIL will be impressed.

letter practice/sensory practice bags


This was definitely not my idea - I saw it on another blog. But I thought it was so cool - and it is! - that I decided to do a tutorial so you could make your own.

I don't know what you'd call them, except sensory bags - but they're not really, except that they ARE squishy. Kids can practice 'drawing' shapes or writing letters with a light touch (preschoolers) or with a Q-Tip (kindergarten +). I wouldn't recommend these for older kids - especially pre-teen boys...sorry SM!....because they may be too tempted to pound on 'em good and then, SPLAT! with disastrous results. But you can always live on the edge, you know...both my girls love these.


1. Gather up your supplies. You always do that first, right? You'll need quart-size freezer bags, some paint - all I had was acrylic, but you could use tempera, too. Also needed is some good, wide, sturdy tape like masking tape or packing tape (not shown). I guess you could use gallon-size bags, but when I tried it myself, it seemed like an unwieldy size. So, just use what you have on hand. I had the giant bottle of paint because of my pumpkin painting project, but the smaller bottles are only about 50 cents at th'WM.
You'll want to go with a lighter paint. I like the look of the pink better than the red, and the orange better than the red, too. But just try it out. If your background (desk/kitchen table) is really light, then maybe a darker paint would work.


2. Open a Ziploc bag and squish some paint in. Now, I tried to eyeball it, and it looked to be about 3-4 tablespoons. I think that less is more, because I ended up having to squish some back out of the orange bag...not pretty. Of course, if you're using a larger bag, more paint goes in.


3. Mash the paint around a bit to see if it looks like it will cover the inside of the bag. You don't want it so deep that gentle pressure won't leave an impression, but also not so sparse that you can't tell what the impression is. This is the step where you get the amount right, because in the next step you will be....
4. Putting the tape on. I probably should have used masking tape for the tutorial, but I couldn't find it. The goal is to completely seal the top of the bag. I laid the bag on its side, put the tape just below the 'zip' and then turned the bag over, sealing the top down to the other 'zip.' There was overlap, and I cut off all but about 1/4 inch. Just for insurance.


5. OK, now you're done! Use a Q-Tip (ahem, a cotton swab) to make designs or practice letters. The bags withstood 3 days of homeschool use with my 5 y.o., who is by no means gentle. She practiced writing M, S, L and who-knows-what and she seemed to like them.

I even practiced my initials some.

Thinking about how this could be improved, I wonder if some other medium could be used like a thinned out version of the paper mache goop with food coloring, dish soap with food coloring or even old beef gravy or yogurt that you are so sick of eating but you can't bear to throw away....

Wednesday, February 25, 2009

quasi crafti

Here’s my mom's birthday card I made last week..... I ended up liking it, but it just didn’t flow like they do when I’m in the groove. I stamped a piece of pink cardstock with pink, purple and white brilliance inks – using cork ends I’d salvaged from the old exterminating biz.

Next I glued on some random pink disc beads a friend gave me – then I trimmed the paper with decorative scissors, layered it - - and stamped the sentiment in watermark ink and dusted it with pigment powder. After layering that with foam squares I attached it all to a card and tied a ribbon on the edge (default embellishment when I can’t think of anything creative and the card is looking gaudy).

To accompany this card is the actual gift - - a late Valentine’s Day present, yes, because I borreyd it for mah back door…
Front:

Back: On the other hand, for the last month or so I felt like I had been churning out the creative projects – even the girls got in on the act. Here’s their donation to a blank wall in the kitchen:

(our wall isn't pink, that's just the way it turned out in the pix.)

I finished a few other projects that I’ll share with ya later.

I made it!


Don't laugh. It looks better in real life. Its a fruit wreath! You can barely see the dried petite pears, but those are grapefruit slices on a handmade wreath - made from wisteria vines I pulled down from our yard back in Chesapeake.

And then there are the gourds: I forgot to take pictures of them after I finished them in November. The best looking ones were given away as Christmas presents, but here is a before and after (I tried to crop all the dust off the shelf but it didn't work!)
I saw a wren perched in the hole this morning. Dunno if she was eating the seeds out of it that I left in or scouting out a nest spot! Its sprayed with glossy sealer so it should hold up just fine.

OK, and here is the last thing:

Hannah's dress. Its reversible, too - and before you get carried away thinking I know what I'm doing, that trim is fabric-glued on there because I messed up the stitching and couldn't figure out how else to cover it. The buttons are just sewn on because I couldn't figure out how to make the bodice truly reversible. I traced one of her other jumpers to get the pattern and just kind of guessed at it. The red polka-dotted side turned out a little better I think - but they both are good for church. I'm going to learn from my mistakes and try to do a better job next time.
OK, that's enough blowing my own horn. I just wanted to show you what I've been working on!!