This is our family's version of a popular gut Amish dish. Its kinder-friendly comfort food and it travels and freezes well. Great for sharing with a recovering friend or bringing to a pot-luck dinner, AND you probably have everything you need for it in your pantry and freezer.
I never bring home leftovers. In fact, I'm surprised I haven't shared it here before. If you Google the name, you'll come up with a half a dozen varieties on both the ingredients and the spelling of the recipe name. A friend shared this with me over ten years ago and its in regular rotation at our house!
Yumasetta
1 lb. ground beef
(*optional: 1 small onion, diced)
1 can tomato soup
2-3 tbs. brown sugar OR molasses
American cheese slices (1/2 a package or so, I guess) (yeah, I know, but I said its comfort food, right?)
1 lb bag egg noodles (however wide you like)
1 can peas, drained (or equivalent amount frozen, steamed lightly) (*optional)
1 can cream of chicken soup
1/4 to 1/2 cup or so of milk (or evaporated milk)
Brown ground beef, break apart into chunks. Drain. If you use an onion, chop it in small pieces and saute it in a little olive oil. Add beef to pan with onion. Add brown sugar or molasses to meat and stir, stir in tomato soup. If its looking a little dry, add about 1/4 cup (not much!) of water to the can and swish to get the rest of the soup out.
Meanwhile, boil your noodles following package directions. Drain them and stir in the cream of chicken soup. Add milk to the can and swish good to get the rest out.
In a 9x13" dish (or any casserole pan - I usually divide this recipe into two pans and freeze one for later), layer about 1/2 of the meat mixture on the bottom of the pan. Spoon out about 1/2 of the noodle mixture over top. Cover this with the peas, sprinkling them over all, including the edges and corners. Layer the cheese slices (1 slice thick) to cover all of the peas/noodle mixture.
Layer the rest of the meat over the cheese, being sure again to cover it completely. Layer the rest of the noodles over that, spreading to cover. Finally, put a final layer of cheese over the whole thing.
Bake it in the oven at 350* for about 20-30 minutes, or until the cheese is melty and possibly the edges are starting to brown. Really, don't be ferhoodled...you're just blending the flavors and heating through; everything is already cooked.
This is best when its been made several hours ahead of time and the flavors have time to meld. But honestly, es gut right out of the oven; the whole thing takes about 1 hour from start to finish including cooking and cleanup.
Let me know if you made it, and if so (most importantly), what did your family think?

Showing posts with label recipes. Show all posts
Showing posts with label recipes. Show all posts
Tuesday, April 17, 2012
Thursday, July 28, 2011
Hot Weather Inside Activity
Han asked today if I'd make "edible sand," something she saw in a magazine. I didn't have the ingredients for it, so I made edible play dough instead. They are having a blast, and I have time to take a break get my work done!

1 box cake mix that you bought for a recipe then decided not to make
1/2 stick of butter @ room temp/soft
1/3 of cream cheese block left out since breakfast, so its at room temp
Mix all together for about 3-4 minutes in (preferably) a stand mixer. It should start to really clump together.
Use trays to keep clean, washed hands and kitchen tools to play!

Wednesday, April 27, 2011
Recipe: Rice and Beans with Andouille Sausage
This was such a great put-together recipe that I wanted to share it with you. Its another one of those recipes for which the ingredients are pretty standard pantry fare, except for the sausage ~ but if you find it on sale, you'll have a healthy and delicious supper in no time. My girls loved it, although Hannah didn't eat the sausage, and Abigail didn't eat the beans. Go figure. The flavors all blend together very nicely. You could also substitute chicken for the sausage, but the little bit of 'kick' provided by the spicy anduille sausage would be lost. In that case, add a 1/2 a cup of salsa OR some adobo sauce from a can of chipotle chiles.
Beans & Sausage
2 links of andouille sausage (or chorizo... the andouille links were about as long as my hand)
1 cup frozen (or 1 can) corn
1-2 cups rehydrated black beans (or 1 can, rinsed well)
1 small can (8 oz) tomato sauce
(optional: 1 small onion)
(If onion is used, saute in canola oil first unitl soft, remove from pan and proceed. ) Cut sausage into 'coins' then into quarters. Cook in skillet over medium heat until cooked through and it begins to brown or crisp on the sides. Add corn, beans and tomato sauce. Fill tomato sauce can with water and add it to the mixture. Cook rice separately and serve under beans and sausage mixture.
Let me know if you make it and how it went over with your family!
Tuesday, December 7, 2010
Peanut Butter Chewies
One thing that is important to me as I school is making basic things like math and reading relevant. To this day, in order to remember certain fractions, I picture a cherry pie and decide whether I'd rather have 1/8 of it or 1/9th, etc. as I was taught back in 4th grade.
We're beginning early fractions with Hannah and I found a perfect recipe that includes basic fractions. For our "lessons," we used different sized measuring cups (e.g., 1/3 or 1/2) and added them together to make a whole. It was great to see Hannah "get it"!
My friend Andrea coincidentally* posted it to Facebook the day before we began fractions.
(*I don't really believe in coincidences, do you? God loves us and is REAL in our daily lives!!)
Anyways, this recipe is from back at our Triple-R Ranch camp days. I remember making sheet pan after sheet pan of these things, mixing them in the big Hobart floor mixer, and eating them until my jaws hurt. They're a wonderful recipe because they take no time at all to prepare, and you "always" have all of the ingredients on hand.


RRR's Peanut Butter Chewies
1 cup white sugar
1 cup light corn syrup
1 1/2 cups peanut butter
4 cups corn flakes*
1/2 cup salted peanuts (optional)
1 tbs. vanilla
(*I had some leftover "Uncle Sam" cereal that I added to the cornflakes, which is why these look dark.)
Stirring frequently, bring sugar and corn syrup to a full rolling boil. Allow to boil for 1 minute.

Remove from heat and add peanut butter. Stir to melt.

Add cornflakes, vanilla and nuts. Stir gently.
Using a cookie/meatball scoop onto wax paper. Allow to harden.

Store in fridge or freezer, allow to come to room temperature before eating (unless you have an uncle who is a dentist and provides free services....)
Friday, September 3, 2010
A Recipe For the Birds
Someone asked me the other day to share my recipe for suet cakes, and was only too glad to oblige!
Now, technically, suet cakes are made from rendered beef fat that theoretically can be purchased at a butcher or sometimes found in the meat department of the grocery store. But in Real Life I've found that when I am able to find suet, the birds don't care for it as much as what I make myself. Pre-made, pre-packaged suet cakes can be purchased at the dollar store for - guess what - a dollar each, or you can make them very frugally at home with leftovers.
For us, making our own suet cakes involves my best parenting skills, some homeschooling lessons and satisfies a portion of our entertainment budget - birdwatching.
For starters, begin to collect the following:


Store the unused portion in the freezer. Again, it would be a good idea to label the container. You don't want Daddy-o getting his hopes up for a freezer pie and then having them horribly dashed when he takes a bite of that gross stuff.
Oh, and if you look really carefully in the picture above you'll see a blue snowflake-looking sequin where the cake slice was removed. That's from where I swept up something - probably cheerios - off the floor and just dumped it in....!
Now, go take that chunk-o-suet-cake and put it in your suet feeder that is hung alongside your other bird feeders and watch the show. You'll enjoy woodpeckers, various sparrows, tufted titmice, nuthatches, and even cardinals.
Homeschooling lessons: Identify birds using a field guide or the Internet and talk about the varieties of birds and animals that God created for our enjoyment. Discuss which birds prefer seeds, which prefer suet, which are foragers on the ground under the feeders. Of course, in making the suet cakes there are dozens of lessons on food, measuring, heat, solids vs. liquids, etc.
Enjoy the birds!
Now, technically, suet cakes are made from rendered beef fat that theoretically can be purchased at a butcher or sometimes found in the meat department of the grocery store. But in Real Life I've found that when I am able to find suet, the birds don't care for it as much as what I make myself. Pre-made, pre-packaged suet cakes can be purchased at the dollar store for - guess what - a dollar each, or you can make them very frugally at home with leftovers.
For us, making our own suet cakes involves my best parenting skills, some homeschooling lessons and satisfies a portion of our entertainment budget - birdwatching.
For starters, begin to collect the following:
- "edges" off of PB&Js (<---parenting skills!)
- freebie bran cereal that gives everyone tummy aches if they eat it (coupons!)
- stale cheerios (coupons again!)
- forgotten fruit including skins and cores
- lumpy grits
- spilled oatmeal
- stale bread
- heels of bread - but only after you've made enough bread crumbs
- raisins that get spilled in the pantry and are too dirty to eat
- stale cookies
- peanuts that the 3 year old sucked the salt off of and tried to put back in the jar (!)
- mushy blueberries that no one will eat
- etc., etc.

Store these items in the freezer. I use a bread bag and just dump the stuff in as it collects, tie it off loosely and replace it in the same spot every time so I know what it is.
 |
| See? Bird stuff on the right, hot dog buns on the left. |
Next, getcha some shortening. Not the all vegetable kind, either. You're going for the artery busting stuff - Manteca - the animal byproduct, gross-out staple of the Southern Pantry.
 |
| Mmmm, mmmm! |
Seriously, though, the birds need fat to convert to energy so they can fly. Have YOU ever tried to fly? Its tiring stuff. You need manteca. Well, THEY need it. YOU need Omega-3s, but that's another topic.
Melt that stuff down. Scoop out a couple cups of it and put it on the stove top, stirring, watching carefully, because it will burn. And start a BIG hot fire. I know these things.

Then, get out one of your jars of $1 or less peanut butter - from a good Kroger sale where you stocked up on 22 jars of it or from where you found it at the Dollar Tree. Scoop out a cup or so of that, too and put it in the pot to melt along with the shortening. Yummo!

Now, why I don't have a picture of this next step is beyond me. But I think you can figure it out without the visuals.
- Dump the aforesaid bread-bag-full-of-scraps into a giant metal or glass bowl. If you want to keep the squirrels and chipmunks away, add a generous few dashes of cayenne pepper. No harm to the birds, but mammals don't like it.
- Pour the peanut butter/shortening mix over top of the scraps.
- Mix with a spatula very well so that all of the scraps are covered. Beware: its hot. If you're using this as a homeschooling lesson, let the kids know to stir carefully so they don't burn themselves.
- If you need more shortening and peanut butter, go for it. I use a ratio of about 3:1 with shortening and PB. You just want the PB there for the taste mostly.
- Pat it all out nicely into a cake pan:
 |
| Mouthwatering! |
 |
| Slice and serve! |
Store the unused portion in the freezer. Again, it would be a good idea to label the container. You don't want Daddy-o getting his hopes up for a freezer pie and then having them horribly dashed when he takes a bite of that gross stuff.
Oh, and if you look really carefully in the picture above you'll see a blue snowflake-looking sequin where the cake slice was removed. That's from where I swept up something - probably cheerios - off the floor and just dumped it in....!
Now, go take that chunk-o-suet-cake and put it in your suet feeder that is hung alongside your other bird feeders and watch the show. You'll enjoy woodpeckers, various sparrows, tufted titmice, nuthatches, and even cardinals.
 |
| Here's a little downy woodpecker.... |
 |
| ...all of 5 minutes after I put the suet into the feeder! |
Enjoy the birds!
Wednesday, May 26, 2010
Homemade Barbecue Sauce (recipe)
Homemade Barbecue Sauce for Meat
1 (small) can tomato paste
1 (8oz) can tomato sauce
1/2 cup brown sugar
1/3- 1/2 cup molasses
1 tbs liquid smoke
1 tsp salt
1/3 - 1/2 cup apple cider vinegar
Mix all together in saucepan over medium heat, stirring occasionally. Allow to simmer 2-3 minutes, turn off heat and let sit until cool or ready to use. Refrigerate unused portion.
Tuesday, March 30, 2010
(Frugal) Dyed Eggs
At least 5 years ago, I bought an 8-pack of Wilton paste food coloring at Michael's Craft Store with a 40% off coupon. It couldn't have cost more than a few dollars, and has turned out to be one of my best investments - we use them for homemade play dough, homemade birthday cakes and, of course, dyeing Easter eggs. Pink is the only color that is getting low in the pot, and I think that in another year or so I'll have to buy a solo container of that one. The others are still going strong!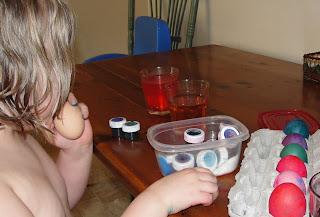
 Hannah took a more casual approach to her attire.
 We had an abundance of brown eggs this year; our neighbor boy up the hill stopped by two weeks in a row. I didn't remember from last year whether brown eggs took the dye very well -
 but here, Hannah shows that for the stronger colors, at least, they worked just fine! I used the lightest eggs of the two dozen we had on hand, just in case.
We did this after supper, and after bathtime......
 Abigail chose to dress for the occasion, while.....
 Hannah took a more casual approach to her attire.
 We had an abundance of brown eggs this year; our neighbor boy up the hill stopped by two weeks in a row. I didn't remember from last year whether brown eggs took the dye very well -
 but here, Hannah shows that for the stronger colors, at least, they worked just fine! I used the lightest eggs of the two dozen we had on hand, just in case.
Homemade Easter Egg Dye
1 tbs white vinegar per dye color desired
1 cup (approx; just eyeball it) boiling water
paste food coloring- as much as will fit on a toothpick when you scrape it in the pot
Mix vinegar, water and dyes (separately per color) in glass containers (plastic will stain) and stir well. Soak hard boiled eggs in dye bath for a few minutes, and:
WAH-LAH!
You just saved a few dollars on packaged dye! Plus, you can dye eggs any time of year with what you have on hand (red, white & blue? green for St. Pats?). Use the egg carton the eggs came in to hold your finished creations.
Wednesday, January 13, 2010
Homemade Laundry Soap, Part 2
Well, as for cleaning, it seems to clean as well as any other. The true test is whether it bothers our skin at all - Andy said if he starts itching to death or anything he's dumping the whole batch in the creek. If you live downstream and notice that your crayfish are especially shiny, then you'll know what happened.
But so far, there have been no complaints.
I also made another batch of detergent, using the same ingredients, but this time I chose to make a powder recipe. I used the same boxes of opened Borax and Super Washing Soda, and the baking soda cost me, oh, what - $.39/box at WalMart? Again, the bar of soap was $.79 (not on sale). So, using the products I had on hand, it was less than $1.50 for many loads. I don't have an exact number of loads, but I'll count.
Here goes:
1 scant bar of Octagon Soap (smuggled in this time, so Andy doesn't have a flashback) (use 2 cups, not packed down, but bang the measuring cup on the table to make sure its close to 2 cups. I had about 1/2 cup left over)
2 cups Baking Soda
2 cups Super Washing Soda
3 cups Borax
Grate soap finely* (now, the recipe calls for "bar soap." However, Octagon and Fels-Naphtha are soaps specifically marketed as stain removers or laundry soaps, so I chose that one. You can also use Ivory, and feasibly any other soap your family enjoys. This would also be one way to avoid the itching issue as indicated earlier.)
Add remainder of ingredients and mix well.
Mix very well.
Pour into a clean, dry apple juice bottle you've been saving for something like this.
Use about 1/4 cup for each load.
Yield: Approximately 2 quarts dry "powder"
*I used a cheese grater with a fine grate. I wish I had a box grater because this was the Pampered Chef roll-type grater I found at a thrift store years ago and it is nigh unto impossible to clean. So if you've over for supper soon and I ask if you want fresh grated Parmesan cheese on your pasta, I'd suggest you politely decline. Unless you like burping soap bubbles.
Stay tuned for updates as to the status of this experiment!
Friday, January 8, 2010
Homemade Laundry Soap
Guess what I made this morning! The recipe I used yielded about 3 gallons. I'm no math whiz, thus the queasy feeling I get when someone springs a word problem on me, but even I can figure out that this will save us money - one way to recoup the $500 we spent on the installation of a water softener over Christmas.
I've researched this idea off and on for years, and finally all the ingredients were easily obtained, so I gave it a shot. The recipe I ended up using seems to be pretty standard in the blogosphere. I found this at TipNut. Interestingly, when I consulted The Tightwad Gazette, there was no recipe for a laundry soap mentioned. Whether this was an oversight in the final text or what, I wonder.
You can look at the recipe at the link above, but here are the ingredients I had to purchase:
1 box Borax from WM ~ $3.50
1 box A&H Super Washing Soda from Alice.com* $2.76
1 bar of Octagon Soap** from Bartley's Meat Market ~$.79
I had on hand:
water
big jug
funnel
empty milk jugs
empty detergent jug
Notes:
* I looked high and low for this product, and two years ago could only find it online at a case price of something like $13 plus shipping. I discovered Alice.com, a site that offers free shipping with only a minimum 6 item purchase. They market themselves to folks who want to avoid trips to the grocery store for essentials and bulky items. They occasionally have great clearance sales on things like razors, Lipton tea, etc. Their prices are average, in my opinion, and generally I can get better prices at Kroger by shopping sales and using coupons. But I was elated to see Arm & Hammer Super Washing Soda there at a very reasonable price.
** Andy FREAKED when he saw 2 bars of Octagon soap on the kitchen counter yesterday. I mean, FREAKED. He backed across the kitchen with his hands up in front of him as if fielding off a bad dream and said, "Ohhhh, no, you're not bringing THAT stuff in the house!" Further investigation revealed that he has an intimate knowledge of Octagon soap a la:
Hmph.
Anyways, it appears that per the label on the empty laundry detergent jug I used will yield about 44 loads per container, and I made 3 containers with the recipe, or about 3 (scant) gallons.
So, if my math logic is correct, it means that the recipe yields approximately 130 loads. The cost of the ingredients - the initial purchase - was $7.04. Do you divide 130 by 7.04 or is it the other way around?? Well, one way comes out to $18 a load and the other comes out to just under $.05 a load. I'll go with that one. Considering that say, I can get A&H (my usual brand) on sale for about $3 a jug for 32 loads, at $.09 a load (or $10.60/load, depending on your math), it comes to a savings of about 50%. (I say "about" because I have NO idea how to figure actual percentages!)
Of course, the proof will come out in the wash. I'll have to do another post on whether it works, whether it smells OK, whether it gives us a horrible rash and whether Andy has flashbacks and needs to be hospitalized for shock therapy. That will be a fun post to write!!
Wednesday, October 14, 2009
Preserving the Harvest
Some sweet friends of ours gave us a WM bag full of Keifer pears and a big Ziploc bag of pared apples - both from their backyard trees. Today I finally got around to putting them up. We made applesauce, pear sauce and some pear juice (nectar). Hannah and Abigail helped - some - mostly Abbo ate bits of fruit and draped herself with the peelings, so I spent a lot of time chasing her out of the kitchen.
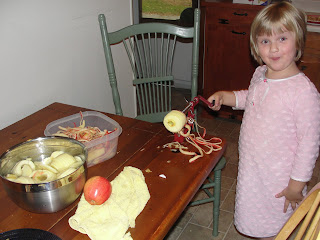
First we peeled and cored the apples with the apple machine. Its fun to use and saves much time. It probably wastes a little bit more of the flesh than a good paring knife would, but the fun is worth it, and it got them to help. We dunked the sliced apples in a water/lemon juice bath.
Then we cooked the apples down with about 3" of water in the pot. I actually used a mixture of about half backyard apples and half Gala apples, on sale at Kroger this week. But it was so sweet that I didn't need any sugar - again, trying to cut out sugar where I can in our diets.

Our yield for the apples was only 4 pints....so I did pears, too. I used a scant 2/3 cup of sugar for the whole pot:

I drug out my immersion mixer, only to find out that it was broken. It is so handy for stuff, yet it wouldn't spin no matter how much I coaxed it. (HINT, HINT: CHRISTMAS IDEA!!) So the applesauce is chunky - I used the blender to mix up the pears since they tend to be grainy. That's also why I used sugar - to overcome any objections that might arise at suppertime :)
Process for 20 minutes:
 And the end product:
I'd say that I put the peels and the cores out in the back yard under the pear tree for the deer, but since its after September 30, the peels and cores are for the rabbits, skunks and squirrels. And crows. And opossums. Some type of animal will be feasting down there tonight!
Leftover Broccoli Soup
Whenever we have mashed potatoes for supper, the girls are glad. Not because I spent 30 minutes trying to get the lumps out, but because for lunch the next day they get broccoli and cheese soup, with the mashers being the main ingredient. Its super easy to make, uses items you have on hand, uses up leftovers (so its tres frugal), and as a bonus, you can slip in other vegetables for extra vitamins. One caveat: my girls love, love, love broccoli, so if you or your kids don't like it, it might not go over as well as it does at our house.
Broccoli and Cheese Soup
leftover mashed potatoes....anywhere from 1/2 cup to 2 cups (this will be the base, so it will determine how much of the other ingredients you use)
broccoli (I got a couple bags on clearance...organic, no less...from Kroger. It was fresh, so I quickly parboiled it a minute or so to soften it up) florets, chopped into bite sized pieces.
1 cup water + 1 chicken bullion cube OR
1 cup chicken stock OR
an equivalent liquid...like broth, granulated bullion, etc.
cheddar cheese - shredded, 1/2 to 1 cup (I only buy cheese when its less than $3 a pound and keep it in the freezer. If I get it in blocks, it crumbles easily when it thaws, but I also try to keep the pre-shredded in there, too.)
Here's How:
Boil water or stock, dissolve bullion in it. Stir in mashed potatoes...if you need it thicker, add instant mashed potatoes until its close to desired thickness. Add broccoli florets (and shredded carrots, peas, or anything else)(you could also puree those veggies to hide 'em if necessary). Stir in the cheese - you want it pretty cheesy, and I like to save a couple sprinkles for on top.
That's it. The cheese will thicken it a little more than the mashed potatoes will....for some reason I always want to add some cooking sherry to it, but I never have it. I think that would just round out the flavor a bit. But when cooking for preschoolers, its probably best to leave the alcohol in the pantry. At least that's my take on it.
Let me know if you make it and if it turns out! It really is great comfort food, and you just about always have the ingredients on hand. Plus, it uses up leftovers, so its great all around!
Tuesday, October 6, 2009
homemade yogurt
Hannah loves yogurt. Loves it, loves it, loves it. Aside from expense, though, every one on the shelves has a handfull of chemicals in each serving and at least that much sugar. As I'm trying to limit her sugar intake, she doesn't get to have this treat very often. But I want her to eat healthy, so I did some research and came up with a recipe for homemade yogurt. The cool thing is, no special equipment is needed, just a crock pot. A couple weeks ago I passed up a yogurt maker in Goodwill because I didn't know if it worked or not and I didn't want to risk the $2 to find out. So I was elated when I found out I had made a wise decision.
On the Day of My Fall, I had 2 quarts of whole milk percolating in the crock pot for the first stage of the recipe. Andy dumped it down the drain after he had me safely tucked in ARH for the night. Yesterday was my first chance at a second attempt, so I stayed out of trees for the day and made another batch.
Here's the ingredients:
2 quarts of whole milk (later I'll experiement with 2% and 1%....right now I'm working on avoiding sugar and corn syrup) (organic milk - Kroger has a good price on it - would be a good choice if you're concerned about it...just make sure the milk is not "ultra-homogenized")
1/2 cup plain yogurt (for starter...I used Dannon Activa which has a little sugar, but in a whole batch I figured that much sugar wouldn't have a strong impact. You just need to have a yogurt with "live and active cultures" and I wonder if they all do)
1 envelope unflavored gelatin
mix-ins: fruit, Splenda, True Lemon, Stevia, etc. (not all at once, but experiment with individual servings. We used Splenda and blueberries, Splenda and True Lemon). Again, my goal was to avoid sugar, so fresh crushed fruit went a long way.
Here's how:
Cook 2 quarts of milk on low in the crock pot for 2 1/2 hours.
Unplug crock pot and let it sit for 3 hours.
After 3 hours, scoop out 2 cups, wisk in 1/2 cup starter yogurt and the gelatin to the 2 cups, mix well and add back to the pot. Stir to incorporate.
Put the lid back on the crock pot and cover with a heavy towel or blanket. Keep unplugged.
Let sit for 8 hours.
After 8 hours, stir again and its done! Divide large batch into smaller ones that you can flavor as desired and refrigerate. The consistency is not as thick as regular store bought yogurt, and I wonder if adding an extra pack of gelatin would help. But regardless, after being refrigerated overnight and allowing the fruit to blend in, it was delicious. I think that fresh, juicy peaches would be a wonderful addition - or even canned, diced peaches with a little bit of canning syrup.
I don't know if yogurt can be frozen - I mean to preserve the 8 little pints (?) of yogurt we have in the fridge - but that said, I think I'll turn some of this into pushup pops for my wee ones.
Let me know if you make it. Hannah found it to be delicious. Even Abbo, who is not a big a fan of yogurt as Hanno is, enjoyed it!
Monday, August 17, 2009
Chocolate Chip Cookie Recipe
(Adapted from an Amish recipe)
1 cup butter, room temp.
1 cup sugar
1 cup firm packed brown sugar
3 eggs, lightly beaten
1 tsp baking soda
2 cups all purpose flour (I use bread flour for all my ap flour)
1 cup whole wheat flour
3/4 cup oatmeal OR instant oatmeal
1 tsp vanilla extract
1 pkg milk chocolate chips
preheat oven to 375. cream butter and sugar. add eggs and vanilla and mix well. stir dry ingredients except for chips together in a bowl and add to sugar mixture, mixing well. add a handful of flour if dough seems too sticky. mix in chocolate chips. scoop out with a cookie scoop and bake 12-15 minutes. cool on wire racks.
This recipe doubles easily....I don't use salt because I use salted butter, but you could add a tsp of salt if you want. Add some nuts at the end, too, if you want. I have no idea how many it makes...3 dozen?? Who knows. We have dough-eaters here, so I never get an accurate count.
To freeze: scoop dough out onto a cookie sheet and pop it in the freezer. when dough balls freeze, transfer them to a freezer Ziploc bag, label with directions and date, and store.
Friday, May 1, 2009
Pork Recipe
In honor of Swine Flu Hysteria, I thought I'd share a delicious pork barbeque recipe that I enjoyed with my family last night. (You do know, don't you, that you don't get H1N1 from eating pork, right? Anyways, its got enough vinegar and a long cook time that no heebeegeebies could survive!) I would like to say that it rivals Pierce's BBQ in Williamsburg for taste, but you'll have to be the judge.
small pork butt, pork roast or country style pork ribs (not spare ribs)
1/4 cup apple cider vinegar
Cook for 4-5 hours on high in crock pot (if frozen - or cook 6-8 hours on low). Remove meat, set aside to cool. Remove drippings, put in bowl for fat to congeal in fridge.
When meat is cool enough to touch, separate meat from fat, bone, etc. and return to crock pot. Pull apart big chunks, but don't have to shred it at this point. Discard fat, add juices to juice in bowl in fridge.
Add to meat in pot:
small can (8oz) tomato sauce
1/4 cup apple cider vinegar
1/4 cup brown sugar
1/4 cup molasses
several-to-many dashes Tabasco or Texas Pete (you want to taste the heat as you swallow, but not in every bite)
sprinkling of salt over it all
stir well to mix
turn crock pot to low - cook for at least 2 hours;
when fat in fridge has hardened, discard the fat and pour juices back into pot. Stir. Cook awhile longer to get all those good flavors just right...then enjoy.
Let me know if you made it and what you think!
Tuesday, November 25, 2008
There is just no time! I think that somewhere deep inside once I thought that if I were a stay-at-home-mom I would have all this free time on my hands to pursue my crafts, to laze and to take wonderful hikes in the woods, etc. But NO! Spend my time cleaning up after the two beasties, keeping pace (and usually losing) with laundry and keeping everyone fed, clothed and happy. At best I think I do a marginal job on everything.
The flu bug lingered even though we used Tamiflu. We didn't use the full dose, I guess that's why - and my appetite still isn't right - no problem there, and no complaints. But here it is just a couple days before Thanksgiving!
We're travelling to Tidewater for the holidays; lunch with Andy's family and supper with mine. We plan to leave to come back on Saturday morning, and avoid (hopefully) the Sunday rush. We'll see how that goes. I have a tension headache thinking about the trip down there on Wednesday, the busiest travel day of the year. So it goes.
Today we made turkey handprints. As usual, as soon as my back was turned, Hannah smeared herself with paint up to her armpits. Sorry - no picture. I didn't even have to guess what she was doing when I heard her say, "oooooooh, PUR-ple!" The Sugar Baby looked like a scapled Indian with warpaint and a smear of peach paint up the back of her head. There was a faint misting of blue around her lips from where she was pensively mouthing a paintbrush. But we 'captured' several flocks of turkey for the grandparents and for the scrapbook. Very festive.
OH! Almost forgot. THank you Loretta, I went ahead and made a "healthy" oatmeal cookie for our take along snack. I forgot to mention that I have an abundance of cold cereal (I get it free or 75% off with coupons and sales), so I wanted to use that in the recipe. After tweaking one I found online, here it is (it has loads of ingredients, but the flavor is worth it):
"Healthier" Oatmeal Cookies
1 cup ww flour
1/2 cup ap flour
1 1/2 tsp baking soda
1 tsp salt
2 tsp cinamon
1/2 tsp nutmeg
1/2 tsp ground cloves (optional)
1 cup butter, softened
1 1/2 cups brown sugar
1 cup white sugar
3 eggs
1 tbs milk
2 tsp vanilla
3 cups rolled oats
1 cup nuts (peanuts), chopped fine
2 cups cereal (combination of cheerios, raisin bran or rice krispies or etc.)
3 tbs flax seeds (if you have 'em)
1/4 wheat bran
1/2 cup raisins
1/2 cup fried fruit (blueberries, coconut, raisins, apples or cranberries) or chocolate chips or butterscotch chips, etc., according to your prefernce for "healthy" cookies
Preheat oven to 350. Put flour, spices, salt, baking soda in bowl, mix and set aside. Cream butter and sugars. Add milk, vanilla and eggs, beating well after each addition. Add cereal, fiber, seeds, nuts and fruit. Mix well. (I use my stand mixer). Scoop dough into walnut-sized balls, flatten slightly and bake for 15-18 minutes until brown. Leave in towards the shorter time limit for chewier cookies, longer for crisper cookies.
Friday, September 26, 2008
pizza nite
Several times a year I get one of those e-mail chain letters asking me to submit a recipe to top person on the list, with the promise that I will get oodles of recipes emailed to me in return.
Well, it has never happened. Receiving recipes, that is. I usually get a couple return emails telling me "thanks but no thanks" from friends who have tried this way to build up their recipe files, but have been unsuccessful as well. And then I get embarassed!
Truly; I've dutifully sent the edited email out to "10 or more of my friends" and received (1) a "recipe" suggesting "breakfast for dinner" of pancakes and sausage and (2) a "cut-and pasted" recipe from the Everyday Italian website (you know, the Food Network show hosted by the girl who eats half a cupcake and says that "oh, I'm just so fullll!" IMO, her hair is too long not to be pulled back while she's cooking and her blouses are cut too low! But enough of that!) that was far too complicated for me and used ingredients you'd have to buy at a specialty store! With apologies to the last author of said email (BF!), here is a recipe for anyone - and you don't have to forward it to anyone! (But you CAN! And you can email ME a recipe back if you want! LOL!!)
 This is one of our favorite suppers. One, because everyone gets just what they want, another, it is (believe it or not) fast and easy. It only takes a total of 45 minutes from start to finish.
Pizza Dough Recipe ("tweaked" from the Tightwad Gazette II):
3/4 cup warm water (including any leftover milk I have from a kid's cup in the fridge left over from lunch) (unless you're coming for company then I omit this part) (maybe)
1 scant tablespoon dry yeast (or one packet, but it is cheaper to buy yeast in the jar and store it in the fridge)
1 scant tablespoon sugar
2 cups AP flour, plus a little more (I use bread flour for all my baking, don't think it would make a huge difference)
1/4 cup extra virgin olive oil
1 teaspoon salt
couple shakes of Parmesan cheese, if desired
Combine about 1/4 cup of the water with the yeast and sugar in a large stand mixer (or food processor if you don't have a stand mixer). Let sit about 5 minutes until bubbly. Add the oil and salt and mix together with dough hooks (process a few bursts with the food processor). Add the rest of the water and flour and mix until well blended. If using dough hooks let it mix for about 3-5 minutes, if a processor, maybe let it roll around the bowl 25 times or so. If dough is way sticky, add a handful of flour. If not, pat it into a ball (get all the dough off the sides of the bowl) and let it rest with a towel over it for about 10 minutes.
Next divide the ball in half and mash out on a pizza stone or in a jelly roll pan, OR, in a cast iron skillet. I usually use my marble roller to get an approximate circle, then mash the rest of the way with my fingers. If using a skillet, it makes a great "pan" pizza. Mash into a pizza shape slightly larger than the pan bottom. Pour a little melted butter and/or olive oil over the bottom of the pan to cover and then lay the crust in the pan.
"Par-bake" the crust for about 8-10 minutes at 425. At this point you can take it out, top it with your favorite toppings and return it to a 425 oven for about 10-15 minutes or until crust is brown and cheese is bubbling. The girls like spinach, broccoli, fresh tomato and cheese - and Italian sausage if we have it. Andy prefers traditional pepperoni and cheese. Mama just LOVES spinach, tomatoes, olives and feta cheese, but will settle for anchovies and tomatoes and mushrooms. Yum!
If you don't want to eat it now, after par-baking, let the crust cool, wrap it well with plastic wrap, label it and put it in the freezer for later. Allow it to thaw somewhat before putting it back into the oven topped with toppings.
Lemme know if you've made it or tried it and what you think!
Well, it has never happened. Receiving recipes, that is. I usually get a couple return emails telling me "thanks but no thanks" from friends who have tried this way to build up their recipe files, but have been unsuccessful as well. And then I get embarassed!
Truly; I've dutifully sent the edited email out to "10 or more of my friends" and received (1) a "recipe" suggesting "breakfast for dinner" of pancakes and sausage and (2) a "cut-and pasted" recipe from the Everyday Italian website (you know, the Food Network show hosted by the girl who eats half a cupcake and says that "oh, I'm just so fullll!" IMO, her hair is too long not to be pulled back while she's cooking and her blouses are cut too low! But enough of that!) that was far too complicated for me and used ingredients you'd have to buy at a specialty store! With apologies to the last author of said email (BF!), here is a recipe for anyone - and you don't have to forward it to anyone! (But you CAN! And you can email ME a recipe back if you want! LOL!!)
 This is one of our favorite suppers. One, because everyone gets just what they want, another, it is (believe it or not) fast and easy. It only takes a total of 45 minutes from start to finish.
 Pizza Dough Recipe ("tweaked" from the Tightwad Gazette II):
3/4 cup warm water (including any leftover milk I have from a kid's cup in the fridge left over from lunch) (unless you're coming for company then I omit this part) (maybe)
1 scant tablespoon dry yeast (or one packet, but it is cheaper to buy yeast in the jar and store it in the fridge)
1 scant tablespoon sugar
2 cups AP flour, plus a little more (I use bread flour for all my baking, don't think it would make a huge difference)
1/4 cup extra virgin olive oil
1 teaspoon salt
couple shakes of Parmesan cheese, if desired
Combine about 1/4 cup of the water with the yeast and sugar in a large stand mixer (or food processor if you don't have a stand mixer). Let sit about 5 minutes until bubbly. Add the oil and salt and mix together with dough hooks (process a few bursts with the food processor). Add the rest of the water and flour and mix until well blended. If using dough hooks let it mix for about 3-5 minutes, if a processor, maybe let it roll around the bowl 25 times or so. If dough is way sticky, add a handful of flour. If not, pat it into a ball (get all the dough off the sides of the bowl) and let it rest with a towel over it for about 10 minutes.
Next divide the ball in half and mash out on a pizza stone or in a jelly roll pan, OR, in a cast iron skillet. I usually use my marble roller to get an approximate circle, then mash the rest of the way with my fingers. If using a skillet, it makes a great "pan" pizza. Mash into a pizza shape slightly larger than the pan bottom. Pour a little melted butter and/or olive oil over the bottom of the pan to cover and then lay the crust in the pan.
"Par-bake" the crust for about 8-10 minutes at 425. At this point you can take it out, top it with your favorite toppings and return it to a 425 oven for about 10-15 minutes or until crust is brown and cheese is bubbling. The girls like spinach, broccoli, fresh tomato and cheese - and Italian sausage if we have it. Andy prefers traditional pepperoni and cheese. Mama just LOVES spinach, tomatoes, olives and feta cheese, but will settle for anchovies and tomatoes and mushrooms. Yum!
If you don't want to eat it now, after par-baking, let the crust cool, wrap it well with plastic wrap, label it and put it in the freezer for later. Allow it to thaw somewhat before putting it back into the oven topped with toppings.
Lemme know if you've made it or tried it and what you think!
Tuesday, September 9, 2008
transitions
Hey! Would you keep us in prayer when you think about it? We are going through some transitions and as we all know, sometimes change is difficult!
We're trying to transition Hannah away from her pass (pacifier), and yes, yes, yes, I know she will be a great big girl of 4 next month, but nonetheless.....she has a very strong attachment to it and it has been very difficult. For her mom and dad. See, I thought they were all gone, but then she spied one she had lost perched prominently on her car seat in Daddy-o's truck. Well, its got some holes in the plastic and its the absolute last one in the house so she is guarding it ferociously. And I do mean ferociously.
Andy is transitioning to a new medication regimen for his HBP. Now, he may not like me blogging about this, but maybe if you see him or talk to him you can ask him how he is doing. We've got a new doctor who is REALLY good - (Dr. Scott in Covington, for all you local readers!) - and who has been very diligent in keeping track of Andy's progress. Still, changing medications is physically painful for him - makes him feel like he has the flu or something.
If you know my daughters, you know that one of them can (please allow me to switch to my professional social worker mode:) exhibit some behaviors that her parents find challenging. As the parent in close proximity to said child for the majority of waking hours, I can report that "challenging" has many defintions and includes a wide and varying range of emotions!
Thank goodness that I am perfect, so I have no issues of my own to work on.
YEAH RIGHT!
But right now, I can't focus on me (sigh.....), so I'll just dedicate all of my time and energies to my family. [Placing palm of right hand to forehead and leaning back in chair, closing eyes....] Ohhhhhhhh, the sacrifices I make as the Mama!
Seriously, though. GOD IS GOOD! And I can't figure out why, but He has been so good to us over the last several years. I mean - I can't figure out why I should receive blessings when I am such "a wretch" and why others who seek Him have the struggles they do. I really have been blessed with Andy, Hannah and Abigail. Although we each have our own challenges in relationships with our personalities, characters and so on, I am always thrilled when I think that God planned for us all to be together and that He has knit us together as a family.
Better go. Gotta get suppah started and the upstairs freezer cleaned out. Can't fit anything else in it and I am afraid of being knocked out by a pot roast when I open the door - ack!
Tonight's supper: pork butt roast in the crock pot with pepper and seasoned salt, green beans from this summer's garden, mac&cheese from the stockpile, apple sauce from the stockpile and bread pudding using up (hopefully) most of the frozen bread out of the upstairs freezer for dessert. YUM!
Tuesday, September 2, 2008
please disregard....
the recipe I posted last.
THIS
is the recipe to end all recipes.
THAT
one stuck mercilessly to the pan, and while it tasted good, was more trouble than this, which is infinitely better.
IF
you come to our home for supper, you can count that this will be the dessert. It is that good.
DULCE de LECHE Pie
1 graham cracker crust
3 cans sweetened condensed milk
Fill crock pot 3/4 high with water. Set on high. After an hour or two it should be simmering, if not outright boiling.
Peel labels off cans of sc milk. Place cans in crock pot - do not open, do not poke holes in them, just put them in whole. Without labels.
Ensure that water is covering cans, if not, add more so they are covered.
Place lid on crock pot.
Once the water begins to boil again, start your kitchen timer.
Boil for 3 hours.
Yes, you are reading this right. You have 3 unopened cans of sweetened condensed milk in your crock pot, boiling away for 3 hours.
Take 'em out after 3 hours and let them cool to the touch - or put them in the fridge for later.
When you are ready to make the pie, use a can opener to open cans. The contents will be a pleasing caramel color. Stir (whip) with a fork until they are smooth. Pour into graham cracker crust. Hint: cut off other end of can so the contents will slide out easier. Do the same with all 3 cans Hint: I only needed 2 1/2 cans for my crust. Your mileage may vary.
Chill pie for at least 1 hour, preferable a couple.
Slice thin....this is VERY rich and is delicious with a cup of black coffee on the side.
Takes awhile, but how easy is that? Let me know if you made it and what you thought!
Friday, August 29, 2008
noise machines
I got sidetracked again.
The point I was going to make about the sound of the rain night before last was about noise machines for sleep. I don't sleep very well - often. I'm probably being stalked by a need to entertain the terrible twos of my life: diet and exercise, but that's another tangent I'd rather not discuss right now. Especially since I have a pie in the oven.
My mom uses a nose machine....TYPO....excuse me...a NOISE machine (jeez!) to help her get to sleep. She's used one for years and even travels with it on overnights. My dad uses a noise machine too, but I will stop that discussion right there because I may spill some family secrets. Like the why of why he uses one. Anyways, my mom and my sister used to get my niece to sleep by running a window unit air conditioner on "fan" in a darkened room. Poor Baby Jordan was out like the dead! So noise and sleep aids have been one of my family values for years.
I've tried noise machines. The problem is I end up listening too hard - I begin to drift off to sleep, only to pick up on the "click" where the loop of the intended relaxing sound ends. Like the "rain" setting on a machine I had once. It was about a 5-second loop...."patter, drip, drip, patter, drip, dr-click!- patter, drip, drip..." and I would lay there and count the repeats. No dice.
The "ocean waves" setting wasn't much better. Way back when we used to saute ourselves in baby oil and lie baking on the sand (oh, my gosh. HOW DUMB WAS THAT? And me a redhead.), I'd count the waves at Sandbridge in Virginia Beach. Every seventh - or occasionally sixth - wave is bigger than the rest in the series. There is a longer pause as the water sucks back to gather for a breaker. Noise machine engineers failed to take this into account. Most machines I've heard either don't caputre the cycle or have the cycle too short - every 4th or 5th wave was the big one ("click"!). Perhaps a surfer's dream come true, but it wasn't helping me catch any zzzzzzzs. I'd just lay there feeling anxious. (In case that grammar is incorrect, I would lie there, too.)
Before I ever purchased (gasp!) a noise machine, in an attempt to make do with what I had, I frugally set the clock radio to the far right wing....er, I mean...SIDE of the dial (of course! you don't think I'd go over to the FAR LEFT, do you?!) to enjoy some cost-free "white noise." All was well and good until late one cloudy night... in that place halfway between awake and asleep I about wet the bed when I heard a heavily-accented man speaking statically in a foreign language from my bedside table. Must have been one of those Spanish language stations out of New York that we pick up when we travel late-nite. Well, adios to the clock radio idea.
So I'm back to the not sleeping. Probably for several weeks if I don't raid the melatonin or spend several hours in the National Forest. But if that's what it takes, then I'll.....
Well, alas, it is 8 minutes till midnight and I am waiting for Andy to come home from a rescue call. I am getting sleepy so I think I will close for now. Before I go...
I made the easiest and most delicious dessert for a cookout we're going to tomorrow at my pal Jessica's. After that last paragraph I took it out of the oven to cool and it smells delicious.
Want the recipe?
Easy Graham Cracker Cookies. Or pie.
2 1/2 cups graham cracker crumbs
1 can sweetened condensed milk
6 oz. semisweet chocolate chips
mix all of these together with a spatula. pour/spoon into 9x9 or 8x8 square baking dish. bake at 350 for 30-35 minutes. cool. slice and enjoy.
Monday, August 11, 2008
Biscuits
Easy, easy delicious biscuit recipe.
These are a quick favorite at our house. Uses what you have on hand and takes about 25 minutes start to finish.
1 stick of cold butter
2 cups (plus a handfull more) self-rising flour
1 cup cold milk PLUS
1 tablespoon apple cider vinegar
Preheat oven to 450.
Using paring knife, cut chunks of butter into about 1/4 to 1/2 " slices into the SR flour in a bowl. Toss the butter with the flour. Use a pastry cutter or fork to chop butter into the flour. Doesn't have to be exactly the size of peas, but should be pretty chunked in.
Cover and chill in the fridge for about 10 minutes. Add vinegar to milk, let sit about 2 minutes. Take flour/butter mix out of fridge, stir in milk mixture with for, just until ingredients are moist.
Turn dough out onto a lightly floured surface; knead 3 or 4 times, gradually adding additional flour as needed. With floured hands, press or pat dough into a 3/4-inch-thick rectangle or whatever. Sprinkle top of dough with additional flour. Fold dough over onto itself in 3 sections, starting with 1 short end. (Fold dough rectangle as if folding a letter-size piece of paper.) Repeat entire process 2 more times, beginning with pressing into a 3/4-inch-thick dough rectangle (about 9 x 5 inches). THIS is the secret to getting the biscuits to rise and have nice, flaky layers.
Cut with a biscuit cutter, champagne glass, empty washed tuna can, or whatever. Cut straight down, do not twist as this seals the edges and they won't rise.
Place on your pizza stone, with rounds slightly touching. You can also use a cookie sheet.
Bake at 450° for 13 to 15 minutes or until lightly browned. Remove from oven; brush with 2 Tbsp. melted butter.
For variety, add a handful of Bleu Cheese or a cup of shredded cheddar and course ground pepper and/or dried herbs.
************
You know, writing this out reminds me of the many folks who have influenced or had an impact on the various parts of my life at various points.
Whenever I make biscuits or anything requring flouring a table, I'm reminded of Joe Olbris. Who else knows Joe?He used to always um....remind me... to close the drawers when I'm working in the kitchen so the flour doesn't get in them. Later, when I go to reach for things in my kitchen drawers, and I find flour or bits of dough, I grin, remembering....Thank you Joe!
Any homemade biscuits always remind me of my grandparents. They (and my mom) made drop biscuits. This recipe can easily be converted to drop biscuits adding a little more milk, and just spooning the dough out by tablespoons onto the cookie sheet.
Finally, my pal Heather introduced me to the concept of meal planning to plan grocery shopping or using what I have on hand. These biscuits are part of my repetoire for certain meals - especially last minute if I have forgotten to make bread!
Subscribe to:
Posts (Atom)